nitto sattelstütze Nitto Lugged Seatpost
SKU: 82276558985
nitto sattelstütze

nitto sattelstütze Nitto Lugged Seatpost

Sale price$19.12 Regular price$21.24
Save 10%

Shipping Estimate
USA
  • USA
  • CAN

Ships within 48 hours · Estimated delivery Jul 7 - Jul 12

Promo Codes Available:

For Your Every Summer RSVP, with Code: SUMMER15

Description

nitto sattelstütze Nitto Lugged Seatpost250mm long, 27. 2mm diameter. Lots of small bikes have really steep seat tube angles. This isnt because shorter people benefit from steep seat tube angles. In fact, for normal bikes, no one benefits from them. If your bars are level with or close to level with your saddle, your ideal saddle position is achieved one of two ways. With a 73 or 72. 5 degree seat tube angle and a 20 25mm set back seatpost, or a 71 or 71. 5 degree seat tube angle and a 0mm

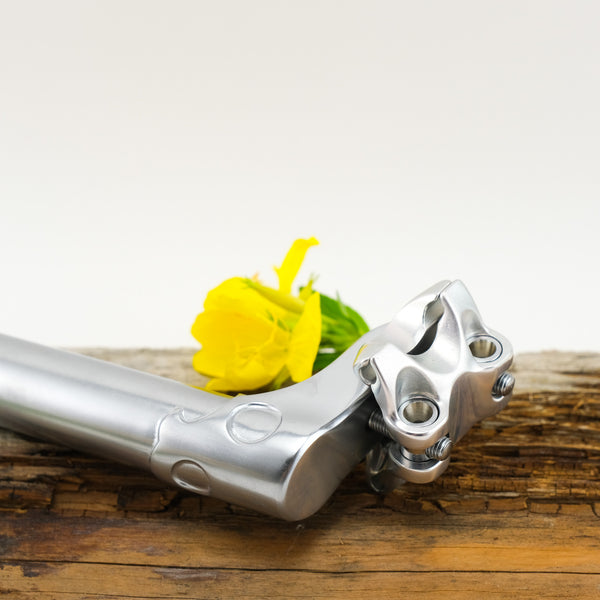
250mm long, 27.2mm diameter.  

Lots of small bikes have really steep seat tube angles.  This isn’t because shorter people benefit from steep seat tube angles.  In fact, for normal bikes, no one benefits from them.  If your bars are level with or close to level with your saddle, your ideal saddle position is achieved one of two ways.  With a 73 or 72.5 degree seat tube angle and a 20-25mm set back seatpost, or a 71 or 71.5 degree seat tube angle and a 0mm offset post.  If your bike is outside that range, it’s likely due to a steep seat tube angle.  

Road bikes under 54cm usually have 74+ degree seat tube angles, and that puts lots of load on your knees, among other things.  Not ideal!  The only way to combat it, besides getting a different frame, is to move the saddle back.  

Most good setback seatposts, like the Nitto S83, only bring ya back about 25mm.  That’s not enough. You need MORE!  Two options: for 74 degree seat tube angles you can probably get away with a Velo Orange setback post, IF they are in stock, which as of this writing they are not.  If you have steeper than that, say 75 degrees, you should get this lugged seatpost from Nitto.  Not because it’s lugged, but because it has a massive 40mm of setback. All that setback will help you get your ass where it needs to be, bio-mechanically.  The catch of course will be that you have to shorten your stem by at least that amount to sit in the same position with regards to your bars.   

So if you started with a 0mm offset post, and went to this post, you want to shorten your stem by 40mm.  If you started with a 20mm set back, shorten it by 20.  Of course, if your bars have always felt too far away, shorten more.  I’ve done lots of stem length experiments, and I can tell you that it’s pretty hard to bring the bars in too close.  Once you get them in close, and you get on a longer bike, it feels LONG and hard to manage, like a drunken in-law after one too many Monkey LaLas.  

This seatpost is steel, and it weighs more than an aluminum post, but it’s not heavy.  It’s just heavier than an aluminum post.  2 bolt clamp, borrowed of the Nitto S83, so that’s a gem, easy to adjust, holds its adjustment like a good toupee glue.  

All Nitto stuff is made in Toyko in a small factory.  This seatpost is expensive because it is nickel plated, brazed, and has a rad custom lug on it.  The time it takes to make this seatpost far outstrips the time it takes to make a carbon seatpost, but carbon seatposts routinely sell for more money.  

Shipping Notes
  • Free Standard Shipping on $100+ Orders to the USA.
  • Except Preorder products are shipped in 48 hours.
  • Delivery to the USA:
  1. Standard Shipping : 3-10 business days
  • If time is of the essence, please consider selecting expedited delivery for faster service.
Exchange/Return Notes
  • We offer a 30-day return/exchange service after receiving.
  • Final sale items are not eligible for returns or exchanges.
  • To process your return/exchange, please contact us at [email protected]
  • Please click here for more details>>> Return & Exchange Policy
SKU: 82276558985

Discover Niche Categories That Outsell nitto sattelstütze

Top-Converting Item to Boost Your Average Order

4.1 ★★★★★
Based on 933 reviews
Sort
Highest Rating
Newest First
Oldest First
Product Reviews
A
Verified Purchase
Alda
Waukegan, US
★★★★★ 5
Very good product. Great Price!
Color: White Ink Pad 2xin
Very good product. Easy to install. All the installation and reset instructions were clearly detailed. I'll definitely buy again.
WAS THIS REVIEW HELPFUL?YesReportShare
Reviewed in the United States on June 7, 2026
J
Verified Purchase
Jill Thorne
Belleville, US
★★★★★ 5
Don't have to be a computer whiz to use, simple instructions
Color: White Ink Pad 2xin
I am not a techy person and when I got the message that my ink pad was full, I thought I would have to buy a new printer. I have a small craft business, and my printers are ESSENTIAL to me. I have never done anything like this before, and it literally took me 2 minutes. I am so excited and relieved that my printer is up and running. The package came with 2 ink pads, detailed instructions, gloves, a waste bag and a screwdriver. Perfect! Just followed the step by step directions and I was done! Yay! Thank you so very much. Saved me so much money and aggravation. Highly recommend.
WAS THIS REVIEW HELPFUL?YesReportShare
Reviewed in the United States on June 10, 2026
N
Verified Purchase
Nicole Reiche
Natrona Heights, US
★★★★★ 5
Good price and good dupe of brand name
Color: White Ink Pad 2xin
Easy to install. Cheaper than buying brand name. Fix perfectly and now I can print again
WAS THIS REVIEW HELPFUL?YesReportShare
Reviewed in the United States on May 15, 2026
D
Verified Purchase
Daniel H. Phillips
Port Orchard, US
★★★★★ 5
Small glitches but renews printer to like new.
Color: White Ink Pad 2xin
Makes the printer work like new, the software works well but I had to run the routines several times before the printer actually actually cleared. Now it works like a new printer.
WAS THIS REVIEW HELPFUL?YesReportShare
Reviewed in the United States on May 6, 2026
D
Verified Purchase
Dave
Boise, US
★★★★★ 1
Really want an Epson Printer?
Color: White Ink Pad 2xin
Buyers get prepared for hours of frustration if have an Epson Ecotank printer because this seller does not tell you what's ahead when buying this product. One's instructions are vague and come with hours of frustration. Forget those U-tube videos they too only want to make small talk, you either buy this product and put up with hair-pulling software, or go directly to Epson and buy direct either way this will make you not want to buy another Epson product. Change out the Ink Pad reservoir in the back of printer at corner behind the ink tank. Will need a small Phillips-head driver (this kit comes with driver) to remove cover, once cover removed remove the ink pad attachment screw, save those screws for reinstalling new ink pad. Now comes the fun part resetting that E-11 Error shown on printer screen. Until this is resolve you will not be able to print anything. Before you get started with the given weblink nothing will not work until you turn off the Wi-Fi and connect printer to computer via USB cable; and, most printers do not come with that cable must buy on Amazon separately (under $5.00). Once cable connected check to make sure have a good connection from the Device Manager. Now clear out all pending print jobs. Then download the weblink shown in the instructions; do not even mess with that Driver and Utility Combo Pack (why instructions shows that who knows why...) just download www.wicrestpro.com then follow instructions; and, if you get a communications error you did not follow these steps in order. When you see Epson Adjustment Program click on the Port you will see selections (Auto Select and multiple printers locate your printer and click on that printer then click OK. Next screen click on Waste Ink pad counter, and make sure on next screen you don't go snooping around, just check all 3 boxes and click Initialize then here is when WTF may or not occur. When the OK button is clicked, counter will be initialized, and you click OK. If you get a Communication Error don't panic go back into your computer setting make sure Firewall for printer is off, Wi-Fi is off, Virus Protector is off, and remove "all pending print jobs" then make sure printer to USB cable is connected firmly. Then go back through same process most likely you will not get Communications error again, but a message reading turn off the printer then after turning off click ok, wait count to 20 then turn printer back on, install paper then click print test page. That's it you have now successfully installed the Ink Pad Counter.
WAS THIS REVIEW HELPFUL?YesReportShare
Reviewed in the United States on April 1, 2026

recommand products