pearl jennifer tiger lily Pink Tiger Lily Bulbs, Lilium
SKU: 59248718817
pearl jennifer tiger lily

pearl jennifer tiger lily Pink Tiger Lily Bulbs, Lilium

Sale price$22.66 Regular price$25.18
Save 10%

Shipping Estimate
USA
  • USA
  • CAN

Ships within 48 hours · Estimated delivery Jul 7 - Jul 12

Promo Codes Available:

For Your Every Summer RSVP, with Code: SUMMER15

Description

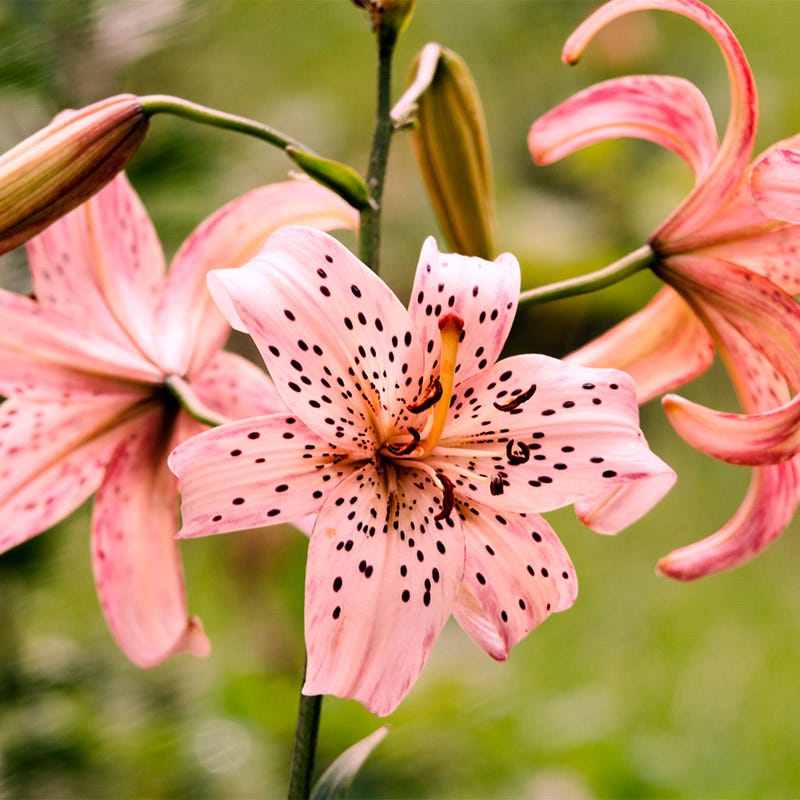
pearl jennifer tiger lily Pink Tiger Lily Bulbs, LiliumIn more recent years, the hybridizers have managed to create new colors in the Tiger Lily group, maintaining the large flowers, the easy culture, the perennial qualities, and even the handsome black spots of the original Orange Tiger.' The true Tiger Lilies: Don't make a common mistake, and call just any old spotted orange lily a 'Tiger Lily.' Only one group is descended from the real thing. Like most Asian species lilies, this old reliable was a

In more recent years, the hybridizers have managed to create new colors in the Tiger Lily group, maintaining the large flowers, the easy culture, the perennial qualities, and even the handsome black spots of the original Orange Tiger.'

The true Tiger Lilies: Don't make a common mistake, and call just any old spotted orange lily a 'Tiger Lily.' Only one group is descended from the real thing. Like most Asian species lilies, this old reliable was a staple in the Oriental diet for centuries. The bulbs were--and are--cooked for foods and soups. But it's not the taste that made this lily bulb world famous. It's the beautiful flowers and the ease of growing them.

The true Tiger Lily is native to Korea, but today, gardeners the world over enjoy the beautiful big flowers on strong stems that return year after year. In fact, Tiger lilies are now so common in the US, many people think they're native.

As long as you have well-drained soil, they will grow for you, perfectly perennial even in some of America's coldest climates.

This is the lily with little black 'bulbils' (baby bulbs) that form up and down the stem in the leaf axils. These little bulbs drop to the ground naturally, and spring up the next year as baby tiger lily plants. Over the years, you'll have an expanding clump.

This is the perfect no-maintenance lily to add to your flower border or particularly, your wildflower meadow. A few towering lilies over a wild meadow in full bloom is a wonderful mid-summer sight.


Growing Lilies: True lilies (which don't include daylilies and others which are not in the genus Lilium) are easy to grow today, and more popular every season. Since they are upright and take practically no space at ground level, it's easy to plant lilies between other established perennials and shrubs. Most can also tolerate some shade, which adds versatility for the gardener. There are many lily groups, but to keep it simple, we will consider only a few of the main types that are important to gardeners. Each lily we ship includes complete instructions for planting. So don't hesitate. You can easily bring the spectacular beauty of lily flowers to any summer meadow or garden.

'Wild' Lilies or 'Species' Lilies These are the true wildflowers from the world over. They are the ones all the glamorous hybrids are descended from. We're fortunate to have some of these botanical treasures on our list of lilies this season.

Oriental Hybrid Lilies are the now famous, very fragrant ones with large, flattened flowers such as red Stargazer and white Casa Blanca. These are the ones now so popular in the floral trade, but are also very easy to grow. They bloom from mid-summer through early fall. Most have very large, outward-facing, fragrant flowers.

Asiatic Hybrid Lilies are today's largest group of garden lilies, quite easy to 'naturalize'. This growing group of lilies was begun by hybridizers in the US, and were first called 'Mid-Century Hybrids.' Compared to Orientals, the Asiatic Hybrid lilies bloom earlier (early to mid summer), the plants are shorter, the flowers a bit smaller, and most blooms are upward-facing and star-shaped. Some of the most famous Asiatic Hybrids are yellow 'Connecticut King,' and the famous red, 'Gran Paradiso.'

Tiger Lilies. This group is led by the famous old orange wild lily, which used to be called Lilium tigrinum. Botanists have changed that to Lilum lancifolium, but that doesn't stop most people (including us) from using the old name 'tigrinum.' From the original orange, the hybridizers have created new colors from white to pink. All have the large flowers, black spots, and tough perennial qualities of the original. (By the way, don't call any old spotted orange lily 'tiger lily'. This one is the real thing, and no lily common name is more mis-used.)

Trumpet Lilies Sometimes called 'Aurelian Hybrids' or other names, the large, tall trumpet lilies are all descended from The Regal Lily, a white wild species lily from China. All are incredibly fragrant, and wonderful for cutting. They grow tall, and often need staking, since a well-grown stalk can have over 15 huge flowers.

Shipping Notes
  • Free Standard Shipping on $100+ Orders to the USA.
  • Except Preorder products are shipped in 48 hours.
  • Delivery to the USA:
  1. Standard Shipping : 3-10 business days
  • If time is of the essence, please consider selecting expedited delivery for faster service.
Exchange/Return Notes
  • We offer a 30-day return/exchange service after receiving.
  • Final sale items are not eligible for returns or exchanges.
  • To process your return/exchange, please contact us at [email protected]
  • Please click here for more details>>> Return & Exchange Policy
SKU: 59248718817

Discover Niche Categories That Outsell pearl jennifer tiger lily

Top-Converting Item to Boost Your Average Order

4.7 ★★★★★
Based on 1668 reviews
Sort
Highest Rating
Newest First
Oldest First
Product Reviews
E
Verified Purchase
Eric J. Jenislawski
Charlottesville, US
★★★★★ 5
Great result, exceptional value, and easy, forgiving application.
Size: TRIM COAT KIT
I am thoroughly pleased with the results of this product, and the application was easier than I expected. Outstanding stuff. I am writing a longer review in case it helps people who are unsure about a "once and done" product that calls itself permanent. It's not hard to apply. It is forgiving and there's time to even it out. But here are some things to anticipate. My use case: I used Cerakote to restore the plastic trim on a used 2014 black Dodge Challenger that had been repainted but the plastic trim was original and it had been kept outside by the prior owner, so the contrast between the new paint and faded trim was noticeable. The trim was originally a deep, dark gray (it is never as black as the paint). It had faded to a medium-gray in many places: running boards on the side beneath the door, below the read bumper (which were also somewhat worn from debris), around the tail lights, and the plastic piece beneath the windshield wipers between the windshield and the hood. These were all looking weathered. The trim was very oxidized in some places, chalky grey near the hood and around the back bumper. The plastic around the tail lights also had light streaks in it from where water drains down from the trunk. What else I tried before I tried Cerakote: I got middling results from Mother's Back to Black. It looked somewhat better for a week or two, and then it went back to looking as before. Not impressed. I got a tip online to try rubbing the plastic trim with a melamine magic eraser, so I did that next, and this made a significant difference. Melamine is abrasive, so be careful if you do this on your trim. I went gently, up-and-down, side-to-side and in small circles, by hand, with gentle pressure like one would with a polishing compound. By removing the oxidation, the plastic was a few shades darker in the worst spots and the streaking on the rear tail light piece was gone. The rough spots on the trim at the bottom of the car and around the wheels looked somewhat better. But it certainly did not "like new." Cerakote experience: I decided to give Cerakote a try based on the video and good reviews. Bam! Back to factory-like deep dark gray. I wish I had taken pictures. It's incredible. Fully satisfied! I had already washed the trim with Dawn dish soap. I started with the trim bone dry. You are warned everywhere that water droplets will ruin the result, so don't expect to do this process right after you wash the car unless you like to live dangerously and have compressed air to spray cracks and crevices. I was worried that application would be streaky if I didn't do it right. Not so. It is forgiving. Here's what I learned. 1) The first 20% of what you'll get out of the packet goes on heavy with the lightest touch. One packet goes a long way. The next 60% is the "normal" application. This goes on the easiest. You can really milk the last drop out of each towelette, but I didn't because the last 20% of what you can get out of it by rubbing it really hard comes out very light and is not worth the uneven application unless you have some random area you don't care much about and want to use the remainder for that. I only used 5 packets to do the whole car. When you start a new packet, the beginning is where you might want to go back later and even it out once the application gets more normal. Or better, start a new packet on a big section to spread it around well and then move to smaller trim when the towelette is less fresh. 2) You've got time to work with it and make corrections. It stayed liquid like water for at least 20 minutes in my conditions: about 80 degrees, not very humid, indirect sunlight on an 80 degree car. Don't apply in direct sun or on a hot car. The product then gets sticky as it cures, but you can still work with it during the sticky time, rubbing it in and spreading it evenly with the towelette. I did not use a microfiber to "knock down" heavy spots. I just came back around with the towelette. I think a dry microfiber might pull off too much product. When it is half-cured, it is sticky and you can buff it with the towelette at this stage to further flatten and even things out. Work in sections, one piece of trim at a time. 3) Overlaps won't show as long as you rub it all in thoroughly. I tried the overlapping parallel passes method that they recommend, and this works pretty well. I was worried that I might get a "double heavy" streak where the passes overlap but this not so unless the towelette is fresh, but this is fixable. You can do a pretty natural, casual back-and-forth motion for the most part and it comes out fine. This is NOT a super-finicky product. I made a second or third back-and-forth pass in a few areas, and used circular motion in some places where the trim was textured or a little rough from wear, and it all looked even in the end. Just rub it down into the plastic and even out the sheen while it is uncured and it's good. 4) It cures like you see it when it's still wet. It doesn't lighten up very much as it cures. It just looks a little less wet. So get it right by eye when it is wet and that's pretty much what you will still have in an hour when it is cured. 5) Don't miss a spot! You'll see it for sure if you do because the different is so dramatic. And a "second coat" is not easy or recommended. This is the only once-and-done part that you want to get right, and you have plenty of cure time to be thorough. 6) Use the folded corner of the towelette to get into small corners and edges, like where the trim meets the paint or has an inside corner or some little nook. A fresh towelette is great for getting into small areas because a feather touch applies plenty of product when the towelette is fresh. The trim now looks amazing and I am entirely satisfied. I will use Cerakote on my other vehicles. The only minor con is a strong ammonia smell when you are up close to it while it is wet. No smell once it is cured. I would definitely wear the recommended gloves while applying. As others say, you will probably drop that towelette on the ground. It's slippery when wet. Keep it folded in quarters as it comes for ease of application. Turn to a new quarter once a side gets dirty or dry and fold it inside out for four more quarters to use. Bonus, but off-label -- at your own risk: The product is not intended for the soft rubber around the windows, but I tried it there too, and it looks amazing. All I did was wash the rubber with dish soap like the trim, and I rubbed it a few times with a wet microfiber cloth to get the superficial layer of oxidized rubber off. Then I applied Cerakote. It looks great. The rubber used to be blotchy and faded. The microfiber evened this out a little. I would not use melamine on the rubber -- this made it look worse in a test section. The Cerakote made it look great: jet black, much shiner, and much more even looking. Not quite "brand new" but far better than I thought possible. I thought I might need to replace the rubber. Now it's looking great next to the jet-black new paint. This afterthought use alone was worth the money. Can you apply a second coat the next day? They don't say you can, and I don't recommend it. This is meant to be one-shot, which is why you should check to make sure you don't miss any spots. I had two areas where I tried a second coat the next day. The first was on the plastic trim between the windshield and the hood. I didn't rub this trim much with melamine beforehand so there was a lighter area (light grey originally, the worst spot) that didn't get as black as the other sections so I did it again, which helped a little, but not much. I didn't wash this area with soap beforehand because I wasn't intending to fix it until I got going. Once you put things back to black you will start noticing other faded things more. Likewise, I did a second coat on the very top of the soft rubber at the bottom of the windows (the part which faces upward and thus gets the most sun), it wasn't as shiny as the other parts, so I went over that section gently again the next day with a fresh towelette. As soon as I did it, I thought it was a mistake. This didn't go well initially because the cured coating is very hydrophobic so the new, wet, Cerakote of the second coat goes on smooth initially and then "puddles up" into little droplets a few minutes later. It doesn't want to stick to the first coat. I thought I had messed it up, but I let it cure a little until the sticky phase, and spread it out again with the towelette. It stayed that time but gathered back a little into some streaks. I spread it once more a few minutes later and it looked good. It stayed even. It looks just fine a few days later, so I think it cured OK. I hope this product last for months as advertised. Even if it doesn't I would totally do it again because the results are superior, I still have half my towelettes left, and the product is not expensive. 10/10 would do again and will recommend to everyone.
WAS THIS REVIEW HELPFUL?YesReportShare
Reviewed in the United States on June 25, 2025
R
Verified Purchase
Robert Barger
Alexandria, US
★★★★★ 5
Easy to use, amazing results
Size: TRIM COAT KIT
This is an awesome product that is easy to use and has amazing results. My plastic trim never looked so good.
WAS THIS REVIEW HELPFUL?YesReportShare
Reviewed in the United States on May 14, 2026
N
Verified Purchase
NorthFloridaLT
San Leandro, US
★★★★★ 5
Made My Bumper Look Brand New Again
Size: TRIM COAT KIT, Size: TRIM COAT KIT
I used this on the plastic trim and bumper on my truck, and I’m honestly impressed with how it turned out. The faded areas came back to a deep, rich black and really cleaned up the whole look of the rear end. I prepped everything the right way by washing it first with an all purpose cleaner, then wiping it down with 91% alcohol. I also taped off the surrounding paint and chrome just to be safe. After that, the application was simple and went on smooth without any streaks or blotchy spots. The difference was immediate. What used to look dull and worn now looks factory-fresh again. It also seems to bond well and not just sit on the surface like some cheaper products I’ve tried before. Overall, this was easy to use, gave great results, and made a noticeable improvement. I would definitely use it again on other trim pieces.
WAS THIS REVIEW HELPFUL?YesReportShare
Reviewed in the United States on April 12, 2026
E
Verified Purchase
E N.
Belleville, US
★★★★★ 4
Good product
Size: TRIM COAT KIT
Good coverage. I've had it on for about 10 days, and it's holding up better than any spray product I've used. Not perfect, but none of those streak lines you get with other products. It's been rained on twice so far.
WAS THIS REVIEW HELPFUL?YesReportShare
Reviewed in the United States on May 8, 2026
E
Verified Purchase
ernieupton
Dallas, US
★★★★★ 5
good product and value
Size: TRIM COAT KIT
worked great on the 10yr old outback. Lasted several months..until we traded it in for a new outback.. will find something else to use it on...!
WAS THIS REVIEW HELPFUL?YesReportShare
Reviewed in the United States on May 20, 2026

recommand products