diy markise camper Camping Markise
SKU: 6749764218
diy markise camper

diy markise camper Camping Markise

Sale price$24.54 Regular price$27.27
Save 10%

Shipping Estimate
USA
  • USA
  • CAN

Ships within 48 hours · Estimated delivery Jul 8 - Jul 13

Promo Codes Available:

For Your Every Summer RSVP, with Code: SUMMER15

Description

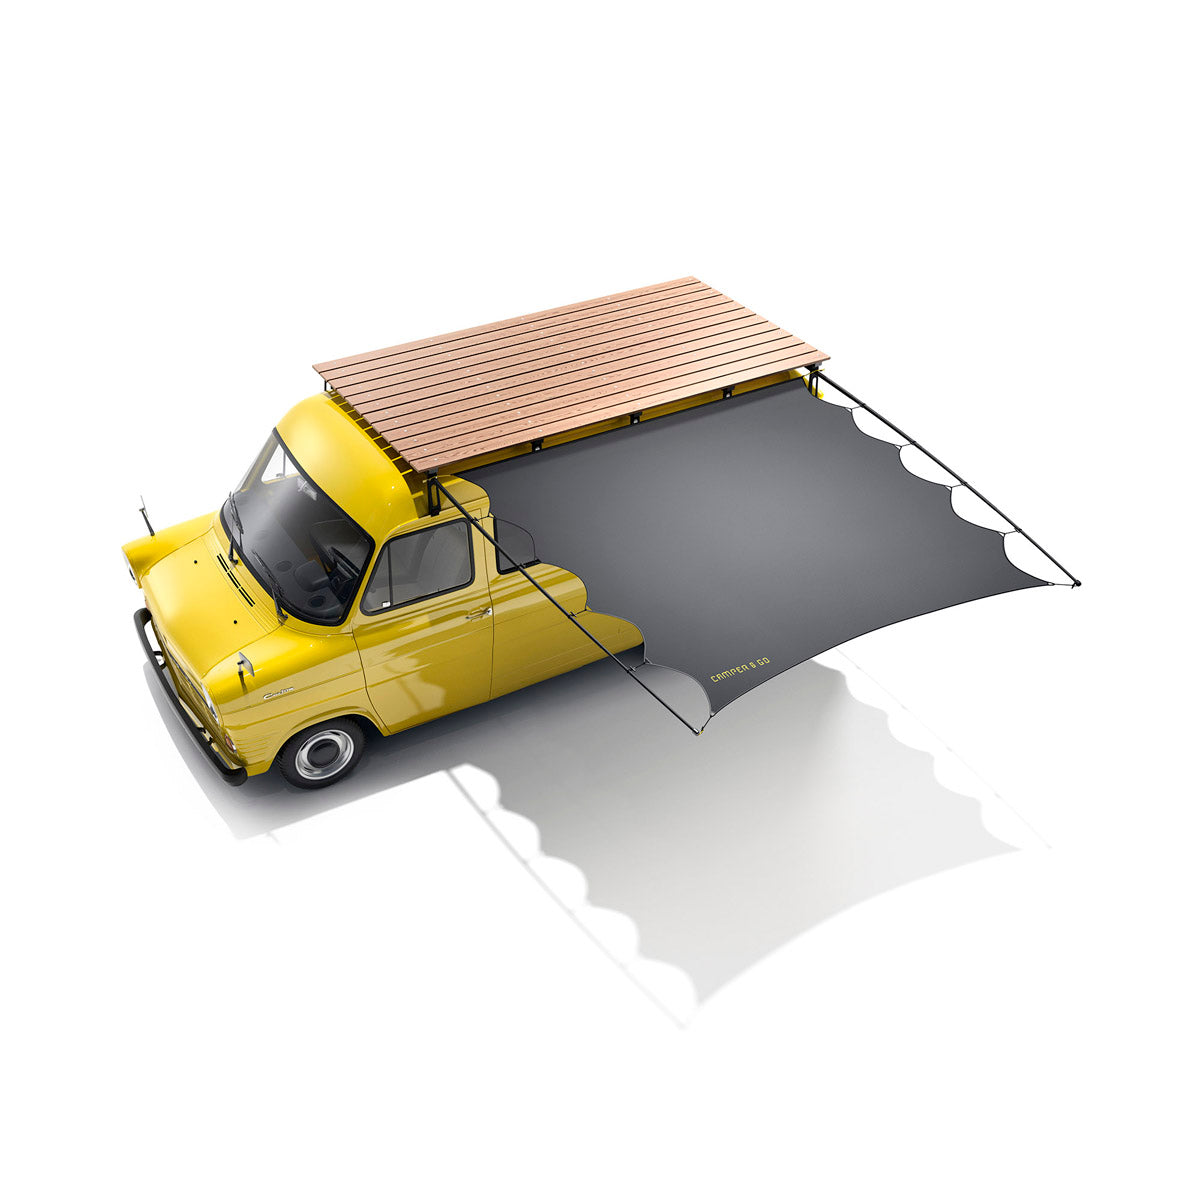
diy markise camper Camping MarkiseDeine Camper & Go Markise Diese einzigartige, sttzenlose Markise spart dir Zeit und Stress. Ankommen, parken, und keine zwei Minuten spter im Schatten chillen! Du kennst die Camper & Go Markise noch nicht? Hier gibt es alle Infos! Produktbeschreibung Was macht die Camper & Go Markise so einzigartig? Funktioniert ohne Sttzen, ohne Schnre, ohne Stress. Nie wieder ber die eigenen Heringe stolpern! Sie ist super leicht und nimmt wenig Platz im Camper weg!

Deine Camper & Go Markise

Diese einzigartige, stützenlose Markise spart dir Zeit und Stress. Ankommen, parken, und keine zwei Minuten später im Schatten chillen!

 Du kennst die Camper & Go Markise noch nicht? Hier gibt es alle Infos!

Produktbeschreibung

Was macht die Camper & Go Markise so einzigartig?

  • Funktioniert ohne Stützen, ohne Schnüre, ohne Stress. Nie wieder über die eigenen Heringe stolpern!
  • Sie ist super leicht und nimmt wenig Platz im Camper weg!
  • Abgebaut quasi unsichtbar. Du hast keinen hässlichen, schweren Kasten am Fahrzeug!
  • Sie ist aufgebaut in 90 Sekunden - Abbauen geht noch schneller!
  • 100% Schatten - klingt selbstverständlich? Hier ist es wirklich so!
  • Wasserdicht - logisch!
  • Wasser läuft einfach ab und bildet keinen schweren "Wassersack"!
  • Bei Wind und Regen kannst du ganz entspannt bleiben. Die Markise hält! Zugelassen bis max. 25km/h.
    Ist die Markise für mich geeignet?

    Grundsätzliche Voraussetzungen:

    • Dein Dachträger (falls schon vorhanden) sollte stabil genug sein.
    • In speziellen Fällen geht es auch ohne Dachträger. Zum Beispiel per Verschraubung mittels Adapter funktioniert die stützenlose Markise auch ohne Dachträger. (z.B. Adapter No. 06)
    • Bei der Installation deiner Camper & Go Markise müssen die beiden Markisenaufnahmen, von Lochmitte zu Lochmitte, im exakten Abstand zu einander installiert werden. Der Abstand entspricht deiner Markisenauswahl.
    • Werkzeug, Knowhow, oder ein Fachmann für die Installation sind selbstverständlich.

    Bitte schau dir auch unbedingt dieses Video komplett an! Darin beantworte ich fast alle Fragen zu Aufbau, Anbindung, und was sonst noch wichtig ist...
    Sollten trotzdem Unklarheiten bestehen, oder du weitere Hilfe brauchen, melde dich bei mir.
    Ich versuche sehr gern dir zu helfen, damit du auch endlich eine großartige Markise ohne Stützen bekommst!

    Was ist mit Wind?

    Die Markise hält so einiges aus, aber sie ist nicht unzerstörbar.

    Die Markise ist bis 25 km/h Windgeschwindigkeit zugelassen. Darüber ist die Markise abzubauen. Informiere dich über das Wetter vor Ort. Besonders an der See können spontan heftige Böen auftreten.
     
    Die Markise darf nur unter Aufsicht betrieben werden. Beim Verlassen des Zugriffsbereiches ist die Markise abzubauen.

    Schau dir einfach diese Video an.

    Wie befestige ich das?

    Grundsätzlich ist die Installation super einfach.

    Alles was du tun musst, egal wo du die Markise installieren möchtest: du musst die beiden Markisenaufnahmen parallel zueinander im richtigen Abstand befestigen. Das ist alles.
    Dafür habe ich einige Lösungen und Adapter entwickelt, die dir verschiedenste Konstruktionen ermöglicht.

    Grundsätzlicher Abstand der Markisenhalterungen:

    Egal für welche Installation du dich entscheidest. Du must den angegebenen Abstand exakt einhalten. Zu wenig Abstand, dann hängt die Markise durch. Zu viel Abstand, dann ist das ganze System zu sehr gespannt. Beides führt dazu, dass die Markise schneller verschleißt, oder nicht richtig arbeitet.
    Solltest du ein Sondermaß benötigen, lass uns telefonieren - bestimmt finden wir eine Lösung.

    Befestigung der Markisenaufnahme:

    Die Markisenaufnahme und die Stofflasche installierst du vorne mit je zwei M6 Schrauben am Camper & Go Dachträgerfuß, oder dem Adapter. Hinten wird die Markisenaufnahme mit je einer M8 Schrauben und der entsprechenden Schraublasche befestigt. Diese werden dann dann am Aluprofil, oder dem Dachträger verschraubt.

    Hier habe ich dir Video zu dem Thema gemacht: Hier klicken. Auf meinem Kanal findest du auch noch weitere Videos zum Aufbau.

    Installation an Camper & Go Dachträgernfüßen:

    Die Installation der Markisenaufnahme erfolgt vorne mit je 2x M6 Schrauben und hinten mit Schraublasche S 01.
    Für die Standard Dachträger (Anschraubpunkte, C-Schine, Airline-Schiene, Fixpunkte) benötigst du die Markisenaufnahme 2° Standard. Für die Regenrinnendachträger benötigst du die 13° Spezial-Halterung. Mehr Infos dazu findest du bei den entsprechenden Dachträgerfüßen.


    Instalation mittels Adapter:

    Falls du mit den Dachträgerfüßen nicht auf die exakten Maße kommst, oder an einen anderen Dachträger bauen willst, helfen dir die entsprechenden Adapter.


    Wichtig!

    Der Anbau sollte durch qualifiziertes Fachpersonal erfolgen! Im eigenen Interesse und zum Schutz anderer muss alles sicher und stabil sein! Safety First!
    Ich übernehme keinerlei Haftung für unsachgemäße Befestigung oder Eigenkonstruktionen!

    Lieferumfang | Nutzerinformationen | Herstellerangaben
    • 2x Markisenaufnahmen - Edelstahl
    • 2x Stoffbefestigungslasche - Edelstahl
    • 2x teleskopierbare Carbonstangen (CFK/GFK)
    • 1x Markisenbespannung inkl. Befestigungsmaterial
    • Schrauben - Edelstahl schwarz (4xM6, 2xM8) 
    • 2x Sicherheits-Anhänger

    Leg dir am Besten gleich die benötigten Adapter, Schraublaschen oder Dachträger in den Warenkorb.

    Technische Daten & Pflege

    Markisenaufnahme
    Material: Edelstahl
    Gewicht inkl. Anbauteile: 1990g (2Stück)

    Stangen
    Material: CFK
    Gewicht inkl. Beutel: 1260g (2 Stück)

    Markisenstoff | Befestigung
    Material Markise: Nylon/Polyester
    Wassersäule 5000mm
    Gewicht inkl. Anbauteile und Beutel: 350g (220cm) / 380g (250cm) / 430g (300cm)

    Gesamtgewicht
    ca. 3,7 kg

    Pflegehinweise

    Stoff

    • Bitte stets trocken verstauen. Wenn der Stoff naß verpackt wird kann es zu Stockflecken kommen und die Beschichtung kann Schaden nehmen. Das führt zu einer Wasserdurchlässigkeit. Also: Wenn's mal regnet und man schnell alles zusammenpackt: den Stoff einfach bei der nächst möglichen Gelegenheit nochmal auspacken und ordentlich trocknen lassen.

    Stangen

    • Die Stangen sollten stets sauber gehalten werden. Wenn die Stangen mit Staub und Dreck bedeckt sind, können diese durch Kratzer verschleißen. Die Klemmung der Teleskopauszüge kann leiden und die Stabilität kann abnehmen. Hier empfehle ich einen besonders sorgsamen Umgang und eine Reinigung mit einem sauberen Tuch nach jedem Gebrauch, um Staub und Dreck zu entfernen. Also mit einem sauberen Tuch abreiben und sie erst dann zusammenschieben.

    Allgemein

    • Reinigung mit Wasser und sauberem Tuch. Keine scharfen Reiniger, Alkohol oder Bremsenreiniger verwenden. Stoff nicht in der Waschmaschine waschen.
    Gewährleistung & Rücknahme

    Jegliche Rücknahme und Haftung ist bei diesem Produkt ausgeschlossen, sobald du irgendetwas an den gelieferten Teilen bearbeitet hast.

    Die Stangen sind vom Umtausch ausgeschlossen, sobald sie einmal in Gebrauch waren, da eine unsachgemäße Bedienung nicht ausgeschlossen werden kann.

    Hier findes du die Bedienungsanleitung: Klick!

    Hersteller nach GPSR
    Camper&Go - Mirko Frank
    Dammstr. 30
    75382 Althengstett
    www.camper-and-go.com


    Shipping Notes
    • Free Standard Shipping on $100+ Orders to the USA.
    • Except Preorder products are shipped in 48 hours.
    • Delivery to the USA:
    1. Standard Shipping : 3-10 business days
    • If time is of the essence, please consider selecting expedited delivery for faster service.
    Exchange/Return Notes
    • We offer a 30-day return/exchange service after receiving.
    • Final sale items are not eligible for returns or exchanges.
    • To process your return/exchange, please contact us at [email protected]
    • Please click here for more details>>> Return & Exchange Policy
    SKU: 6749764218

    Discover Niche Categories That Outsell diy markise camper

    Top-Converting Item to Boost Your Average Order

    4.8 ★★★★★
    Based on 1463 reviews
    Sort
    Highest Rating
    Newest First
    Oldest First
    Product Reviews
    C
    Computer
    Lowell, US
    ★★★★★ 4
    Easy to assemble, does the job, material is shiny nylon and shows creases, minor defects, sloppy
    Size: 3 Panel 12FT W, Size: 3 Panel 12FT W
    The Siebwin room divider is a good idea, and for the price, it mostly delivers on the intended functionality. I ordered the 12 foot, 3-panel version mainly to hide an unfinished basement storage area that had become an eyesore. It works well for that purpose and gives the space a cleaner appearance without spending the kind of money that more decorative dividers or custom partitions cost. If you need something temporary, portable, or mainly functional, this is a viable option. There are a few limitations that became obvious during setup and use. The first thing I noticed was that the weld quality on some of the metal poles is fairly sloppy. Once the cover is installed, you do not really see it, but up close, it does not look especially refined or professional. The blackout material also is not a matte canvas style fabric as I expected. It has more of a shiny nylon appearance, and the creases are fairly visible. Being that it’s more of a nylon, I’d be hesitant to try steaming it to remove the creases. However, the creases do not matter if you are using it in a basement, dorm, or shared room, but for photography, video work, or a professional office setting, the appearance could be disappointing. The fabric is thick enough, though. It blocks visibility well enough, but strong light behind it still shows through to some extent, nothing deal-breaking. Also, my fabric appeared to be slightly defective. The hook and loop strip on one of the bottom sections was off-center and couldn't be totally attached because it was lined up with one of the legs. I originally hoped to use this as a video backdrop, but I will probably end up replacing the fabric with a proper green screen or canvas material while continuing to use the frame itself. For now, it does a good job of covering my basement junk. Assembly was actually easier than I expected and took roughly 15 to 20 minutes. The longer vertical poles are tethered together similarly to tent poles, which made setup straightforward and fairly intuitive. The shorter horizontal pieces slide and snap together to the top and bottom of the vertical assembly. After each section is assembled, the divider panels connect together with metal plates and two knurled screws (at the top and bottom), so no tools are really required. A few screws were difficult to start because paint had gotten into the threads, but once they caught, they tightened down normally. The feet install with similar knurled fasteners and help keep the divider reasonably stable. One thing to watch for during setup is the fabric orientation. There is one arrow indicator in the middle of the fabric to indicate up. However, if you need another indicator, the smaller hook and loop strip goes on the bottom while the longer strip goes on top. I realized mine was upside down right before finishing and had to redo it. I wasn't difficult to redo, despite the defect in mine. The overall design is practical and easy to move around. I do like that the panels can fold and bend into different shapes depending on the space. The widened feet help stability, although when trying to stretch the fabric tight, I noticed the poles sometimes wanted to overlap slightly at the joints. Tightening everything helped somewhat, but it still happened occasionally. The divider feels adequate for normal indoor use, though I would not expect premium durability or luxury-level fit and finish at this price point. The entire device can also be easily disabled and stored in a tote if you need it completely out of the way. It comes with assembly instructions, but even if you didn’t have them, it’s easy to build without them (save a mistake or two). In terms of value, I think the Siebwin divider mostly matches its price. Around $100 gets you a large freestanding partition with decent usability and easy assembly, but there are compromises in materials, appearance, and refinement. The defects are also off-putting, but hopefully you won't have them. Higher-end room dividers can easily cost two or three times more, so some of the tradeoffs are expected. I also noticed cheaper alternatives online, but based on the quality here, I suspect those would probably have even more issues. For practical home use, temporary privacy, hiding storage areas, or separating shared spaces, this is a good option as long as expectations stay realistic.
    WAS THIS REVIEW HELPFUL?YesReportShare
    Reviewed in the United States on May 18, 2026
    T
    Trendy Tales
    Pawtucket, US
    ★★★★★ 3
    Works well but takes up more space than expected
    Size: 2 Panel 8FT W, Size: 2 Panel 8FT W
    This room divider does the job for creating a little extra privacy and was easy enough to set up. The panels feel decent quality and the wider feet help keep it more stable than some cheaper screens I’ve tried. My only issue is that it takes up a bit more room than I expected, especially with the feet sticking out. It’s still portable and folds away nicely, but definitely measure your space first. Overall it works well for separating a room or blocking off an area temporarily. i wish it came in other colors
    WAS THIS REVIEW HELPFUL?YesReportShare
    Reviewed in the United States on May 26, 2026
    K
    Katrina Rhodes
    Battle Creek, US
    ★★★★★ 5
    Nice divider, serves it's purpose well!
    Size: 3 Panel 12FT W
    This room divider worked out very well for what I needed. I wanted a simple way to create a little more privacy and separation in a larger room without doing anything permanent, and this divider was an easy solution. The panels provide good coverage, and the black color gives it a clean, modern appearance that blends in nicely with different décor styles. Assembly was fairly straightforward, and once set up, the wider feet helped keep the divider stable on the floor. I was especially happy with how flexible the panels are to arrange. You can keep it mostly straight, angle it around furniture, or create a more enclosed private space depending on the layout you need. The material allows light to filter through slightly while still offering a noticeable sense of privacy. I’ve used it for separating a workspace area, but it would also work well in bedrooms, apartments, dorms, studios, or shared living spaces. Another plus is that it can be folded and moved without too much effort when you want to change the setup. Overall, this divider delivers a good balance of functionality, portability, and appearance. It’s a practical option for anyone needing temporary room separation without installing permanent walls or curtains.
    WAS THIS REVIEW HELPFUL?YesReportShare
    Reviewed in the United States on May 26, 2026
    J
    Jamie K.
    Phoenix, US
    ★★★★★ 5
    Perfect for Adding Privacy to a Piano Studio
    Size: 2 Panel 8FT W, Size: 2 Panel 8FT W
    I Ordered the 2 Panel version which is way too big for my needs... that's on me. So keep in mind that the picture shows a fabric made for two panels only being used on one and hence it is not pulled tight; it would pull tight and not be so wrinkly if it was set up properly as two panels. The metal pools that make up the panels seem to be well made, stable, and of good quality. They were very easy to put together and they stand up tall with plenty of height. The appearance of it with the fabric on it isn't as elegant as it could be, but it still looks good enough. The material is plenty solid, not allowing light through it, and thereby making a solid barrier. I am using it to block the view out the studio door when a student is sitting at the piano to avoid distractions from the hallway. It will allow a student to enter the studio with our distracting the student who is at the piano.
    WAS THIS REVIEW HELPFUL?YesReportShare
    Reviewed in the United States on May 18, 2026
    J
    Just Me
    Waukegan, US
    ★★★★★ 5
    Room Divider That Gives Instant “This Is a Separate Space Now” Energy
    Size: 3 Panel 12FT W
    The Siebwin 3 Panel Folding Privacy Screen is surprisingly effective at changing the feel of a room without requiring construction, commitment, or somebody yelling about load bearing walls. The 12 foot width gives a substantial amount of coverage, making it useful for creating privacy, dividing open areas, blocking visual clutter, or setting up temporary sections within larger rooms. This saved us a ton of time and money in our new studio and enabled us to create a kitchen and office in one room. The wider feet make a huge difference because flimsy room dividers that collapse every time someone exhales too aggressively are deeply annoying. This one feels more stable and grounded once positioned. The folding design makes it easy to move around or adjust depending on the space, and it folds down relatively compactly when not in use. It is basically the introvert curtain wall of dreams. The material has a clean, neutral look that blends well into different room styles without screaming “temporary office cubicle panic.” It works well for apartments, studios, shared spaces, dressing areas, or simply hiding the mountain of chaos you swear you are going to organize tomorrow. Practical, portable, and refreshingly easy to use without turning setup into a three hour emotional event.
    WAS THIS REVIEW HELPFUL?YesReportShare
    Reviewed in the United States on May 16, 2026

    recommand products